A whole new site
Hello everyone,
we’re proud to announce that we have a brand new site/ blog for World Sweet World, so we’ll discontinue this blog. Please all have a look at and use www.worldsweetworld.com from now on. Cheers!
Crunch in your lunch
I’m a big fan of some crunch in my basket lettuce salads – so here’s an easy method of toasting seeds. I’ve seen bags of ‘salad topping’ in the supermarket, but it’s so easy (and cheap!) to make your own at home.
It’s worthwhile to check out where you can buy seeds in bulk if you use them frequently – they’re not expensive, but you can save some cash if you stock up at somewhere like Moore Wilson’s, Toops or Gilmours.
To make your own salad seed mix, brush a roasting pan with some olive oil and tip in a about 4 cups of seeds. You can make as much or as little as you like, but I enjoy having a good store on hand to keep me going! I like to use pumpkin, sunflower, linseed (also known as flax seed) and sesame seeds in my mix. Mix them around and roast in the oven at around 180 degrees. About half an hour in the oven will have them nicely crisped – just stir them from time to time. 
For extra flavour, add a few splashes of soy sauce or tamari sauce towards the end and mix it around. Once it has cooled, store the mixture in an airtight container.
As well as adding some savoury crunch to salads, it’s a great way to get some protein into your food. I also like to use this topping for pasta bakes and other miscellaneous meals – it’s very versatile. It’s also good by itself, although I sometimes melt some honey and stir in the seeds for a snack.
Just make sure you check your teeth after eating – seeds LOVE to stick in your teeth to add some, uh, mystery to your smile…
x Libby
Mt Victoria Inner City Festival
The Mount Victoria festival is coming up, Sat 27th of February (10am-3pm), with workshops around sustainability, food, stalls and live music (wonderful Tessa Rain will be there).
– Thomas
Way to roll
Here’s another Frocks on Bikes event that shouldn’t be missed:
You can celebrate summer, promote taking the lycra out of cycling and normalising it as a means of transportation, enjoy a leisure bike ride to Island Bay, fall in or out of/ be in/ stay in love with your cycling partner, and even be in two win prizes – ALL IN AN AFTERNOON!
All the info and chance to register is available on frocksonbikes.org.
– Thomas
Beet Blush

Okay so this is a bit more girly – but it was fun making it….
I definitely fall into the category of New Zealander who has OBVIOUSLY descended from a Scottish background. Fair, pale, glowing and ghostly have all been words used to describe my complexion. Sick of being constantly asked if I was, uh…sick, I realised blusher really helps. But I hate spending money on make up, and wanted to make my own – without having to pinch my cheeks constantly.
So – Ms Josephine Fairley stepped forward with a solution. (Okay, well she wrote a few books about natural skin care – we haven’t actually met or communicated in any way, shape or form.) She also has a column that I stole this from at http://www.wealdentimes.co.uk/health&beauty/beauty/wt84_beauty_own-cosmetics.asp
Beetroot and Glycerine Cheek and Lip Tint
You’ll need:
45g raw beetroot, grated
3 tablespoons vegetable glycerineTo make:
Put beetroot and glycerine in the top of a bain marie (double boiler). Heat gently for 15 minutes, cool, then strain into a small jug. Pour into a sealable container. Shake before use, then apply a dab on to your cheeks, blending well. Try smooshing it on your lips, too (it tastes delicious!).
I like to brag about my luck with this, because I just happened to be growing my own beetroot this summer – so it’s my home made, home grown beauty product. I got vegetable glycerine from Homestead Health in Wellington, but it is readily available at health shops and most chemists. I just asked at the counter and they poured me a bottle – I think it was $6 for 200ml, enough to make this several times over – not that I think I’ll need to, as a little goes a long way.
Libby
Basketcase
As a big fan of summer salads, I’ve been enjoying my own salad greens grown literally on the door step!
Although I am lucky enough to have access to some garden space, there’s nothing better than popping out the front door to grab some lettuce or herbs to throw into a meal. I found some old cane baskets at the recycling centre and have simply lined them with newspaper, filled in with potting mix and some lettuce! With a flourish, I present you basket grown greens…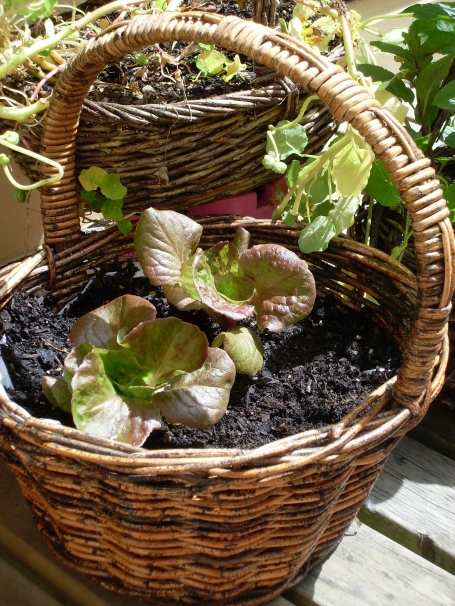
Of course, this isn’t limited to your salad greens – I’ve also got a few baskets of mint, chives, lavender, rosemary and even had some broad beans take off. The baskets make for a cute, cottage-like appearance – but you can of course use garden pots and other random containers to spice up your stoop.  So give it a try – all they need is some sun, water and eating!
x Libby
Hello 2010!
by Libby Callander
A new year, and how lovely it can be to have a fresh start! I won’t harp on about New Year resolutions – I’m just enthused about the symbolism we can take from a new beginning and look at what change we want in our lives.
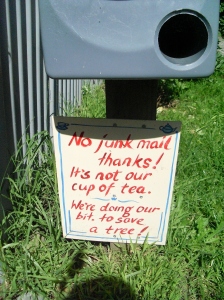 Summer has been an interesting mix of vacations, activities and roundabout weather. I found this awesome letterbox in Paekakariki (whilst making the most of a beautiful sunny day to have a picnic) and thought ‘What a great idea!’. This is just a neat example of a creative way of dealing with unwanted waste…plus I’m always a sucker for the mere mention of a cup of tea!
And I suppose I should quickly introduce myself – I’m Libby, the newbie intern helping out with World Sweet World for awhile as part of my ‘funemployment’. I’ll be casting random blogs into this internet ocean about all things makeable, edible, crafty and environmentally aware. You may have seen a few of my tips about natural house cleaning, so I’m sure there will be a few more that slip in here as well. Keep an eye out – and feel free to share ideas!
Libby
Greens for all seasons
This article is written by Johanna Knox (starcooked.blogspot.com)
While some useful and nutritious weeds wither or die back during autumn, others just keep on flourishing. Two that you’re likely to find growing all year round are chickweed and puha.
Puha: what’s all the hoo-ha?
Botanical name: Sonchus species. AKA: Puwha, Sow thistle
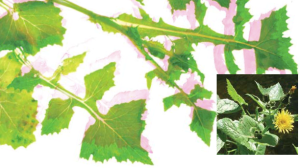 Puha grows all over. There are several species in New Zealand, and even within species, individual plants can look quite different from each other.
Their appearance depends on age, growing conditions, and probably natural genetic variation. In moist, rich soil and some shade, puha can grow huge and lush. Puha plants forced to lead harder lives often have smaller, sparser leaves and a more purplish tinge to their stalks. The flowers of Puha look a bit like dandilions.
Puha as food
Puha is rich in vitamin C and other antioxidants. Young puha leaves and stems are quite bitter. In bigger, older puha, the leaves seem to lose some of their bitterness and even become slightly sour and salty. However, the stems of older plants fill with a gooey white sap that’s extremely bitter.
Young leaves and stems and older leaves can all be used raw as salad greens. Every above-ground part of puha (even the buds and flowers) can be cooked.
If you’re using the stems of older plants in cooking, bruise or crush them when you rinse
them to let the bitter sap wash away. You can substitute puha for spinach in any recipe. Just as
with spinach, allow for it to lose volume when cooked.
Puha as medicine
Bitter-tasting plants like puha have long been known to have medicinal value, and I suspect
many of us 21st century urbanites would benefit from eating bitter greens more frequently.
It’s the actual bitter taste that is important. Bitter tastes trigger a set of responses in your body that stimulate and enhance digestive function, and help your body absorb nutrients. For the best effect you should probably eat your bitters about 15 minutes before the rest of your meal. (So have a puha salad as a starter!)
Avoid bitters if you have ulcers or a reflux condition though, or at least check with a medical
professional first.
Chickweed: star of the wild
Botanical name: Stellaria media. AKA: Starweed
 Finding and harvesting
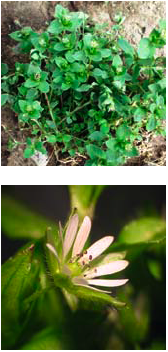
Chickweed likes to grow wild in gardens (often on a bed of soil you’ve just cleared), as well as in the unmowed areas of parks and reserves. It starts life as a mat of tangly, sprawling stems with small teardrop-shaped leaves. The leaves get bigger and the stems more upright as it grows.
Its tiny, white flowers look like they have ten petals, but if you peer closely you’ll see they’re five petals with splits down their middles.
It’s hard to pull a handful of chickweed up without bringing other bits of unwanted weed with it. The easiest way to harvest it is to find the tips, pull them upwards, and snip off the bestlooking bits.
Chickweed as food
Chickweed contains B vitamins, as well as vitamins C and D. It’s also a respectable source of iron, copper, calcium and sodium.
Raw chickweed snipped up into little pieces (1 or 2 cm long) is a healthy and yummy salad ingredient. It reminds me a bit of alfalfa sprouts. You can also cook it in a stirfry, a soup, a casserole or a sauce. Add it at the last minute, and preferably cut it up quite small so it doesn’t feel stringy when you eat it.
Cuisine-wise, chickweed really comes into its own in pesto. It’s one of a number of plants that contain saponins – compounds that lather up like soap. (Some plants that contain especially high levels of saponins are used as natural soap substitutes, but that’s another story.) The saponins in chickweed give your pesto an especially creamy quality.
You can also throw chickweed into a smoothie – it adds nutritional value and makes the smoothie extra frothy!
Chickweed as medicine
It’s partly the saponins that make chickweed valuable as a soothing and healing skin treatment. Chickweed poultices or compresses can be good for eczema, insect bites, and other itchy skin conditions.
To make a chickweed poultice pound a big handful of chickweed in a mortar and pestle, spread it over the area you want to treat, and bind it on with a strip of cotton or gladwrap, or a layer of each (cotton then gladwrap.)
To make a chickweed compress first make juice from a few handfuls of chickweed. You can do this in a juicer if you have one. Alternatively, whiz up the chickweed in a blender or food processor with a little water, then strain the mix through muslin.
If you prefer to take the unplugged route, pound the chickweed very well in a mortar and pestle, add a bit of water, and strain through muslin to obtain the juice.
Finally, lay a piece of clean cotton on a clean towel, and pour the chickweed juice over it. Place the juice-soaked cotton on the affected area of skin, or wrap it around it.
TIPS & TRICKS:
Scavenging for your supper
Wild foods can be fresh, yummy, healthy, and free. And foraging is an addictive pastime.
Tools of the foraging trade
What you need when foraging depends on what you’re planning to gather. But to be very well prepared, take scissors, gloves, several bags of different sizes, and even a small trowel, if you think you might dig anything up. Reusable shopping bags and vege bags are good. (Onya do a good line: www.onyabags.co.nz)
Just how safe is this foraging business?
- RULE #1: If you don’t know what it is, don’t eat it
- RULE #2: Get to know your local toxic plants. Try this Landcare Research resource: landcareresearch.co.nz/publications/infosheets/poisonplants/
- RULE #3: avoid areas that get showered in car exhaust, could be polluted or may have been recently sprayed with herbicide (although harvesting new growth from areas that have been sprayed in the past should be okay)
- RULE #4: Be sure to get permission before foraging on someone else’s property, including farmland.
Creamy Chickweed Pesto
This recipe is written by Johanna Knox (starcooked.blogspot.com)
Find out all about Chickweed (and Puha, aka Sow Thistle) here!
Ingredients
1 clove garlic
2 big pinches salt
2 cups chickweed snipped up and loosely packed
1/4 cup olive oil
1/2 cup cashew nuts, soaked for 24 hours (Soaking the nuts adds to the
creaminess and also makes them easier to digest.)
1/3 cup grated parmesan cheese
The pesto is pretty easy to make:
- Pound garlic and salt in a mortar.
- Gradually add chickweed, continuing to pound.
- Gradually add oil and nuts, until you have a smooth, thick paste. Alternatively, use a blender for all ingredients except the parmesan, and then stir in the parmesan at the end.
Makes over 1 cup of pesto. For a variation, substitute other greens or herbs for some of the chickweed. Yum!
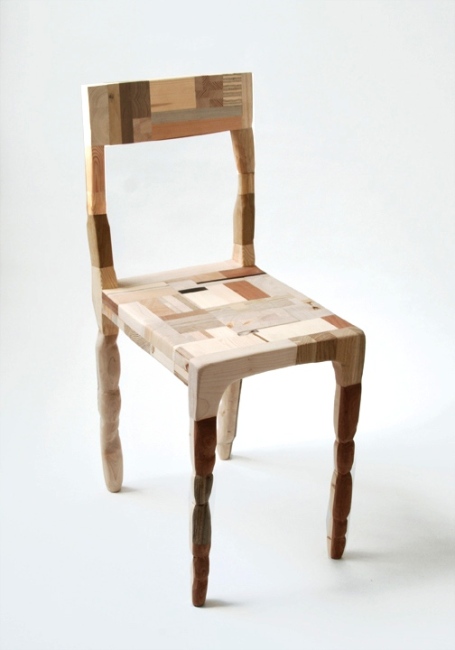
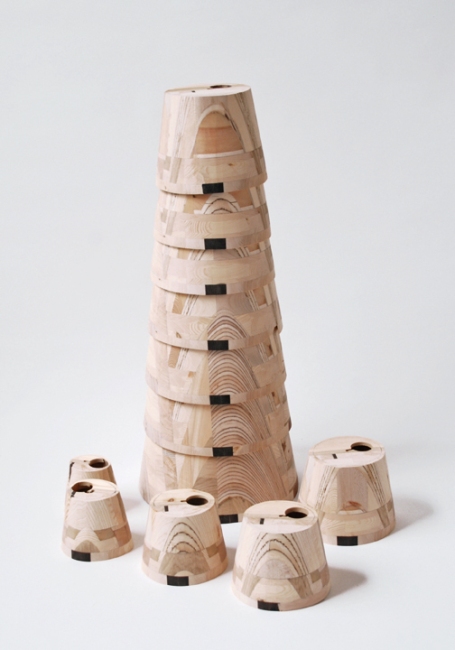
Good Amy Hunting
Amy Hunting makes amazing furniture and art pieces out of scrap wood and rubbish. I’m just blown away by it and want to start gluing cut-offs together. What a wicked idea – the Babooshka lamps, making a beautiful set of lamps (just like the Babushka or Matryoshka dolls – remember?), were cut out of one solid block of glued together wood pieces. Brilliant!


